
by Jean-Pierre Lapointe & Denis Vallée, Technologies Optim
Inc.
(c) Copyright 1998, Technologies Optim Inc.
As when creating any good-quality scenery or animation, it is advised to hand-draw a draft or a story-board, which will help you to realise your project.
The folder “A Bryce Summer — Tutorial” contains all files necessary to complete this tutorial.
Elevations in Bryce are based upon grey shades. The top and bottom levels of a mountain are represented as white and black, respectively. All elevation files necessary for this tutorial are provided.
Start Bryce 3D and create a mountain (using the “Terrain” button).
Associate a new colour to the object family using the second small button in the working area (green for mountains)
and call that family “Mounts”. This will help you later.

Click on “Edit”, then on the “Terrain/Object” button.

Click on the “Picture” button and choose the Mountain01.tif file in the BumpMaps folder.

Click on “Grid” and select “512 — ultra-fine”.
To add erosion to the mountain frame, click “Brush behavior” and select “Erosion” from the pop-up menu.

Drag the cursor along the river and mountain borders.
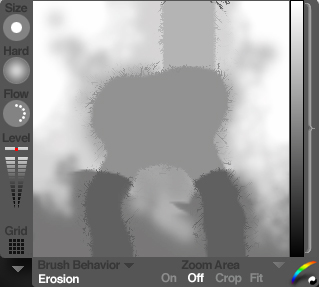
Click “OK” (the checkmark button). You get back to your mounain having the frame for the waterfall and the river. Clicking the “Render” button should give the following result.

Save your project!
>> Forward